Brighten up your home with Hélios Kit!
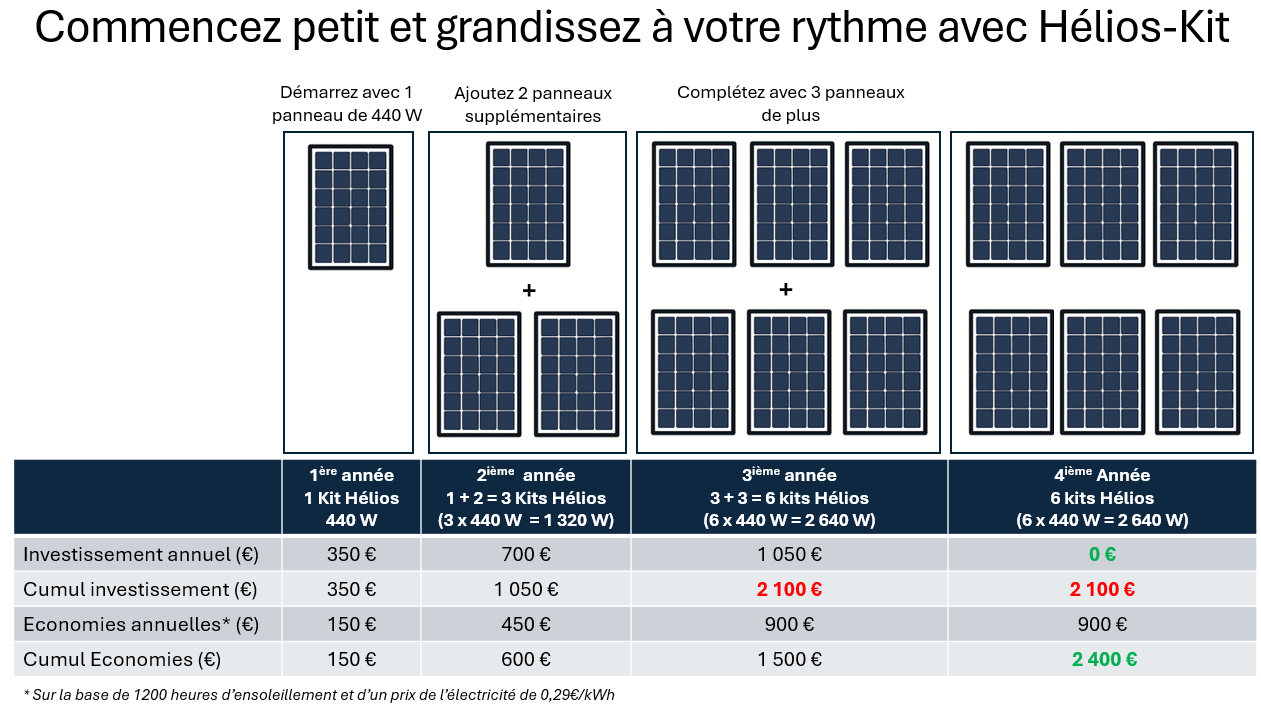
Avec Hélios-Kit, vous pouvez investir progressivement dans votre autonomie énergétique :
1ère année : démarrez avec 1 panneau de 440 W → premières économies 💡
2ème année : ajoutez 2 panneaux supplémentaires → votre facture baisse encore 📉
3ème année : complétez avec 3 panneaux → vous atteignez 2640 W de puissance solaire ⚡
👉 Résultat : en seulement 3 ans, vous avez construit un vrai système solaire pour seulement 2100 € !
C’est la stratégie simple et efficace pour investir sans pression, réduire vos factures pas à pas et devenir producteur de votre propre énergie. 🌍💚

Everything you need to know about Hélios Kit
How to install Hélios Kit?
There are 2 ways to install your Hélios kit, either on the wall using our fixings designed for it, or on the ground in your garden or on your roof terrace with our other fixing system!
Installation of a Helios kit on the wall
The steps for this type of installation are:
- Place the drilling supports on the wall
- Make the holes where indicated
- Screw the fixings to the wall
- Attach the inverter and its support to one of the fixings
- Clip the solar modules to the fixings
- Connect the modules together
- Once you have completed these 8 small steps, you will produce your own green electricity!
Installation of a Helios kit on the ground
The steps for this installation are:
- Attach the brackets to the panels
- Assemble the weight plates to the supports
- Attach the inverter to the fixing closest to the outlet
- Add weight to ballast the panels or screw the fixings to the floor
Connect the modules together
And in the case of several kits?
To install several kits on the same socket, it's just as simple! Only one step needs to be added once the two kits are in place, it is a connection between the inverters, which are then plugged into the socket!
From an electrical safety point of view, the following recommendations must be respected 🙂: no more than 900W connected to a socket circuit (ADEME recommendations). This therefore corresponds to a maximum of 2 Hélios 420W kits
And you are officially in self-consumption!
Installing the Kit
Several criteria are necessary for your production to be maximum:
Guidance
Good exposure is essential so that the kit can provide maximum electricity for self-consumption. The ideal orientation is due south. An East or West orientation remains relevant, but if you only have space to the North for installation, this should be avoided.
Tilt
Tilt is also an important factor to consider. The fixings in the kit are naturally inclined, whether at 30° for those on the floor, or at 60° for those on the wall. Therefore, we recommend that you respect these inclinations, and therefore install your solar kit on a flat surface, whether horizontal or vertical.
The absence of shadow
Be careful, Helios and shadow do not mix! In addition to the 2 criteria above, it is necessary to check that the desired installation location is free of shade. Whether it's a tree, the roof overhang, the neighbor's house, an electric pole...everything can be a source of shade, whatever the season.
If you want maximized production, be sure to check carefully!
The connection
There are a few points to check when connecting the Hélios solar kit to the electrical outlet. First of all, it must be close to the installation. Then, the socket must be 230V 16A 2PT+E, and connected to a quality earth. The electrical circuit must be wired in a minimum of 1.5mm square, and protected by a 16A magnetothermic circuit breaker. Finally, the electrical circuit must be protected by a 30 mA differential circuit breaker
To find out more about our solar kit, you can go to the “Connected solar kit” tab or consult our technical sheet.
Can we install a Kit on a roof?
Roof installation is unfortunately not possible, we only offer wall and floor installations .
The Hélios kit is not currently designed and sized to be installed on the roof. An installation on the roof requires validating the resistance of the fixings to wind 💨and snow loads 🌨️ specific to their location on a roof. Furthermore, installing a solar kit on a roof can impact the waterproofing of the roof 💦 by changing the location of certain tiles. Current Hélios Kit installations do not take this constraint into account.
⚠️We cannot guarantee Hélios kit equipment if it is installed on a roof and we do not encourage our customers to install it like this. However, it can be placed on a wooden shed roof , of low height, in which there is no waterproofing problem. It will still be necessary to leave an air gap of 5cm to properly ventilate the panels. A ground kit can be placed on a flat roof . To do this, you will need to ballast it well and screw it into the ground with screws suitable for your roof.
The advantages of our Kit
A power of 370W per Kit
Thanks to Hélios Kit you can offset up to 20% of your annual consumption. This represents the consumption of a refrigerator, an internet box, 5 LED bulbs and a Hi-fi system
Small installation area
To correctly install your solar kit, all you need is 2.5m on the ground or wall and a standard outlet!
Adapted to your needs
If a simple kit isn't enough for you, no problem! You can connect up to 3 Kits on the same electrical circuit.
Ease of installation
The Hélios solar kit gives you access to self-consumption. For this, 15 minutes of installation and you will use the electricity produced directly


